Exporting
Overview
When you are finished working with your MARC records inside BestMARC™, use the Export tab to get your records out.
Once you export your records, they will be removed from the My Records grid.
Then follow the instructions for getting your records into your Library Automation System depending on if your records are brand new or already existing in your database.
Running some Enhancements may also create
files in the Downloads tab, such as label PDFs for you to print.
Export
Click the Export pane if it is not already selected, or select File > Export to file from the menu on the My Records tab.
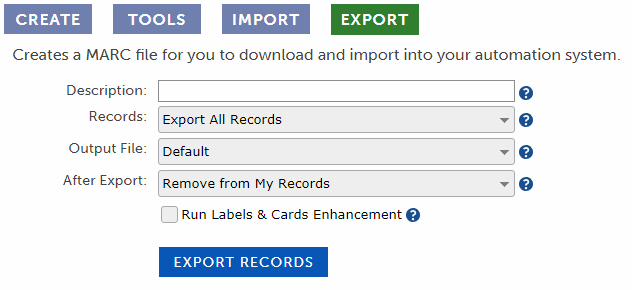
Fill out the following options, then click Export Records:
Description - Enter a name for this group of records. Your records will be listed with this name on the Downloads tab when you are finished.
Records
-
Export All Records (default) - Export all the records in the My Records grid.
-
Export list - Export just the records in the selected List.
-
Export only selected records - Exports only the records you've selected in the My Records grid.
Output File - Determines which records will be saved to the output MARC file.
Default - All records are saved to the output file. Choose this for records that have never been in your automation system.
Include only records with changes - Only the records that had changes since you imported them are saved to the output file. Only choose this option if you are working on large batches of records already in your automation system. This will improve the time it takes to import them back into your automation system.
After Export - Determines what to do with the records (as selected in Records above) after the export has completed.
Remove from My Records (default) - The records are removed from My Records.
Remove records with changes from My Records - Only the records that had changes since you imported them are removed from My Records. Records without changes will remain in My Records.
Keep in My Records - No changes are made to My Records.
-
Run Labels & Cards Enhancement - The Labels & Cards enhancement is run using the settings in your profile. Any PDF files it creates are placed in Downloads along with the MARC file for you to download and print on label or card stock. This setting only applies for subscription types that include Enhancements.
The records are removed from My records and show up in the Downloads tab.
Downloads tab
Click the Downloads tab in the bottom pane or select View > Downloads tab from the My Records menu.
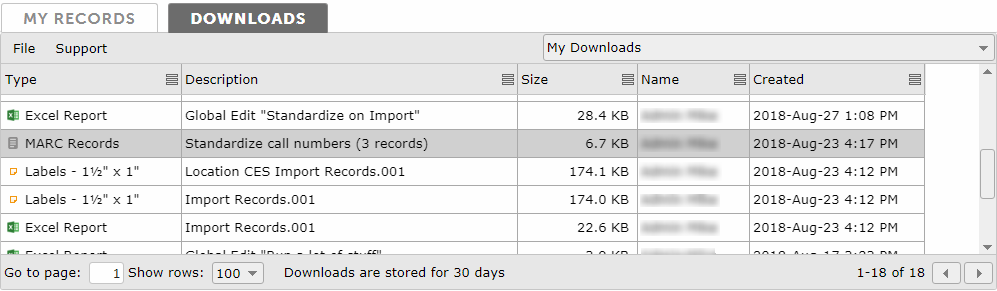
You can resize the top and bottom panes by clicking and dragging the space between them in order to see more downloads at a time.
Filtering
By default only downloads that you have created are shown, as displayed by the My Downloads item being selected.

Select a different item from the list to view downloads for another organization associated with your license, for example downloads for all of your school's or district's users.
Selecting
Select rows from the grid to choose the file or files you want to download or delete.
To select a single row, click on it. Any previously selected row will be unselected.
To select multiple rows, hold down the Ctrl key and click on additional rows.
To select a sequential list of rows, click on the first row, hold down the Shift key, and then click on the last row.
Downloading
There are three ways to download a file from the grid:
Most browsers will automatically download files to a default location on your computer. Here are the default locations based on your operating system version:
Windows 7 and later: C:\Users\username\Downloads
Windows XP: C:\Documents and Settings\username\My Documents\Downloads
Mac: /Users/username/Downloads
Some older versions of Internet Explorer will prompt you and ask where you want to download the file.
Please note the location where you save the file to.
Load Records into your Automation System
Note the location of the downloaded files and use the appropriate Instructions for the type of records you are importing. Choose either Import new records into my LAS
or Update existing records in my LAS.
Library systems have different procedures for adding new records and updating existing records.
Make sure that you follow the correct instructions for adding new records or updating existing records that are already in your system.
Deleting
Files are automatically removed from BestMARC™ after 30 days, however you can also delete them manually.
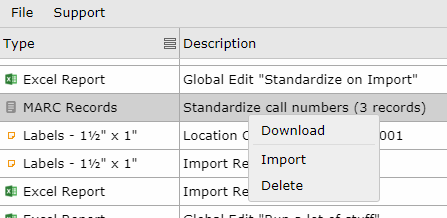
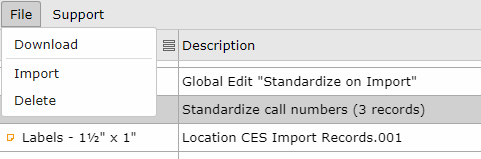
Select the downloads in the grid you wish to delete, then do one of the following:
-
Right-click a row and select Delete from the menu that pops up.
-
Press the Delete key on your keyboard.
If you wish to bypass the confirmation screen that will appear, hold down the Ctrl key while pressing Delete to delete the records without confirmation.
- Select the File > Delete item from the grid's menu.
-
A confirmation screen will ask you if you are sure you wish to delete the record(s). Click Delete to confirm.
Importing Downloads
Exported MARC files can be directly imported back into BestMARC™ from the Downloads tab. Use this feature to easily pass MARC records among colleagues.
Select the MARC Records file in the grid to import, then do one of the following:
-
Right-click a row and select Import from the menu that pops up.
- Select the File > Import item from the grid's menu.
-
A new tab opens while the records are imported and added to the My Records grid. The Status of the import is periodically updated on this tab. You can continue working in BestMARC or close it and your import will continue processing.
A message appears in the same tab when the file has finished importing.