Academic Edition for Students
Overview
BestMARC Academic Edition allows cataloging students the ability to work with MARC records and submit their assignments to their professors. Whether assignments involve original cataloging or
sourcing records from the internet, the BestMARC cataloger can be used to review and modify records while displaying MARC tips, examples, and additional cataloging tools.
The Student edition has all of the same features of BestMARC Global with a few exceptions. Searching the BestMARC record source database is disabled, the Export tab is labeled "Submit Assignment", and sharing features are disabled for students so only the instructor can share.
This document is a very brief overview for cataloging. Please refer to the rest of the User Guide to read details about all of the features.
User Profile
The User Profile contains settings to use when cataloging in BestMARC. Upon signing in to BestMARC for the first time, you will be prompted to set up your User Profile.
You can always get to these preferences by clicking on Profile in the orange bar at the top of the BestMARC page.
Refer to your Professor's required settings when setting your Profile for your cataloging class. Not all of the settings apply to the Academic version of BestMARC. Here are a few options you can set:
- Library Automation System
- Allows you to create copy/holdings based on a given library automatation system.
- Cataloging standard (AACR2 or RDA)
- Ensures all the records downloaded from BestMARC are in your desired format and error checking is based on the correct cataloging rules. This depends on whether the class uses the new RDA standards.
-
Advanced MARC editing
- Turning on this option allows you to see and directly edit the MARC leader and control fields
Cataloging
To catalog a MARC record, first make your Profile has been filled out so the record will be created using your preferred cataloging rules.
-
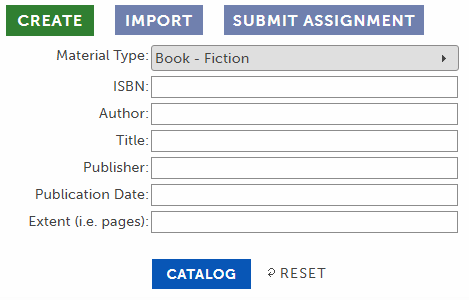
Click the Create pane or select View > Create pane from the grid's menu
-
Fill out all the bibliographic fields for the material. Here are some tips:
Select the appropriate Material type. This will be the record template that is used to create your MARC.
Author: use Last name, First name
Title: if the material has a subtitle, add a colon followed by the subtitle
Pages: enter just the numbers. p. or pages will get added automatically based on your cataloging standard. If you enter something other than numbers, it will be added exactly as you entered it.
Click the Catalog button
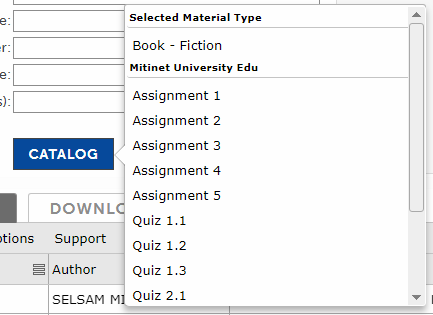
From the menu that appears, click a template to start this new record from. The first option is always the Material Type selected in the Create pane. The other options (if shown) are custom Templates your professor has created for you to start from.
-
A new MARC record is created and opened in the MARC editor based on the entered criteria and your Profile settings. All of the criteria is added automatically to their designated
fields and subfields.
-
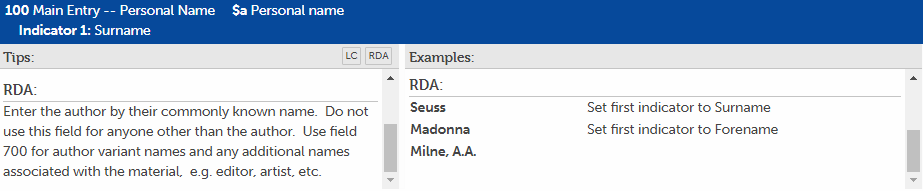
Use the editor's Tips & Examples to verify that all of the information has been added correctly.
-
Use the editor's Errors & Warnings section to help fill out the rest of the suggested fields.
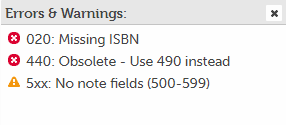
Click on an error or warning to take you directly to the field to fill out and use the Tips & Examples to determine what to enter.
-
For subject headings, use the Subject Explorer to help you find appropriate subjects to add. Try to add 3-5 subject headings.
-
Click Save. The record will be saved into the My Records grid. Please review the Working With My Records documentation for more information.
Importing MARC Files
A file of MARC records can be imported into BestMARC in order to browse, find errors, search, and enhance them. Follow your professor's instructions for obtaining a MARC file.
Click the Import tab or select File > Import MARC file from the grid's menu
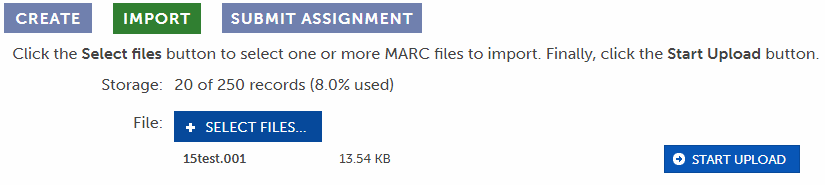
Review the Importing Into BestMARC instructions for more detailed information.
Submitting Assignments
When you are finished working with your MARC records, click the Submit Assignment tab or select File > Submit Assignment from the grid's menu to submit them to your professor.
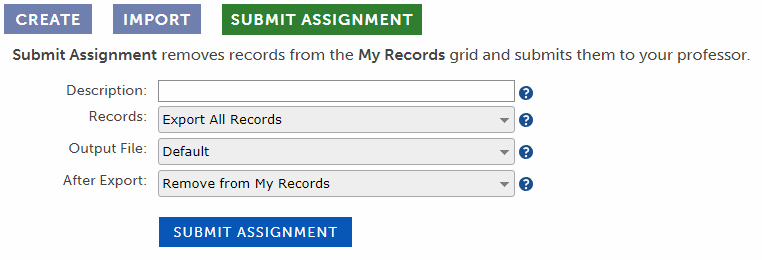
Enter a description for this assignment. This will be the title of the assignment given to you by your professor.
By default, BestMARC submits all the records in the My Records grid. To export a subset of records, select
the records you'd like to export and change the Records option to Export only selected records. Only those selected records will be submitted and removed from the grid.
Click Submit Assignment.
The records will be removed from the My records grid and a confirmation message will appear.
Review the Export instructions for more information.