Templates and Default Fields
Overview
BestMARC contains over 45 default Material Types (for example Book - Fiction, Map, or Videorecording - DVD) each containing the most common fields, subfields, and default data. These are called the Material Type's Standard Default fields/subfields.
Often libraries have specific fields and subfields that they want filled out every time a MARC record is created. You can configure BestMARC to customize the list of Default fields/subfields for each of the standard Material Types.
However, there are times where librarians would like to create their own
customized versions of these materials or different types of materials. Templates are starter MARC records used to help you catalog customized versions of the standard material types or new types of materials
you create from scratch.
Default Fields/Subfields
Default fields and subfields are the ones that show automatically based on the type of record you are looking at. For instance, Videorecording records always show the Video Characteristics (346) field and Video Format ($a) subfield by default but we don't show it for Book types.
You can customize the field and subfield defaults for each Material Type like this:
Open a record with the Material Type you'd like to customize. The Material Type is displayed in the menu.

-
Add and remove fields and subfields in the cataloger to match your desired specifications.
Add multiple fields and subfields if you want repeating fields to show up. For instance if you always want five 650 fields to show, add five 650s to the record.
-
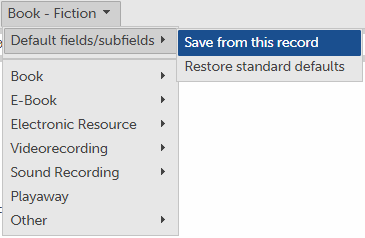
Under the material type menu, choose Default fields/subfields and then Save from this record. Any future record with this material type will now display every field and subfield displayed in this record.
Keep in mind that these are defaults. The cataloger will always show all fields and subfields that have data in them.
To restore the standard Mitinet defaults, choose Restore standard defaults from the Material Type's Default fields/subfields menu.
Manage Templates
Use the Manage templates... dialog to manage the custom templates you've created in BestMARC. To open this window, click Catalog and the templates selection window opens:
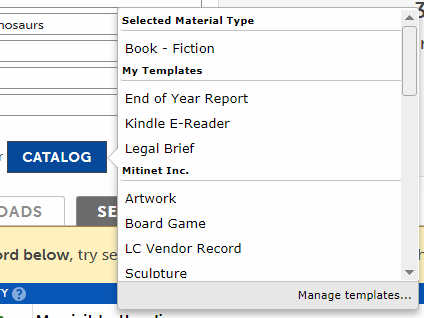
Choose Manage templates... at the bottom of the menu, or in the My Records menu, choose Options > Manage templates...

Templates are sorted into sections based on who they are shared with. The My Templates section includes templates that are private to you. Other sections display templates that are shared across the entire organzation.
Click a template to select it, then click one of the option buttons above to choose an action.
-
New - Creates a new Template.
Enter the name for this new template, then click Ok.
The Edit template dialog opens. Make changes to the MARC record template. When you create a record using this template, it will default to the fields and subfields entered exactly as they appear in this template.
Click Save to save the template. Its name will appear in the templates list under My Templates.
You will be listed as the Author of this template.
-
Modify - Modifies an existing template. The MARC editor opens for you to make changes to the selected template. Only the Author or the Account Manager can modify a template. If the Account Manager modifies a template, they become the new Author.
-
Copy - Makes a copy of an existing template.
Select an existing template to make a copy from.
Enter the name for this new template, then click Ok.
The Edit template dialog opens, loading from the selected template. Make changes to the MARC record template. When you create a record using this template, it will default to the fields and subfields entered exactly as they appear in this template.
Click Save to save the template. Its name will appear in the templates list.
-
Rename - Changes the name of an existing template. Only the Author or the Account Manager can rename a template.
-
Delete - Deletes an existing template. Click Delete on the popup to confirm. Only the Author or the Account Manager can delete a template.
-
Share - Share an existing template with colleagues.
Once a template is shared, all users of the selected organization can use or copy it.
Select My Templates to remove sharing and make this a private template.
Only the Author or the Account Manager can share a template.
-
Help - Opens this help page.
-
Refresh - Download the latest templates from the server in case a colleague has added or modified one.
Catalog From a Template
-
Ensure you have filled out your Profile so the record will be created using your preferred cataloging rules.
-
Fill out all the bibliographic fields for the item. By filling them in here, they will automatically fill into the template. Here are some tips:
Author: use Last name, First name
Title: if the item has a subtitle, add a colon followed by the subtitle
Pages: enter just the numbers. p. or pages will get added automatically based on your cataloging standard. If you enter something other than numbers, it will be added exactly as you entered it.
Click Catalog and the template selection window opens:
Click a Template to start this new record from.
-
A new MARC record is created and opened in the MARC editor based on the entered criteria and your Profile settings. All of the criteria is added automatically to their designated
fields and subfields.
-
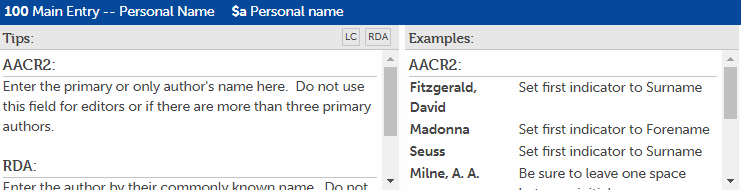
Use the editor's Tips & Examples to verify that all of the information has been added correctly.
-
Use the editor's Errors & Warnings section to help fill out the rest of the suggested fields.
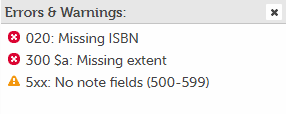
Click on an error or warning to take you directly to the field to fill out and use the Tips & Examples to determine what to enter.
-
For subject headings, use the Subject Explorer to help you find appropriate subjects to add. Try to add 3-5 subject headings.
Click Save. The record will be saved into the My Records grid.